What is Soil Compaction?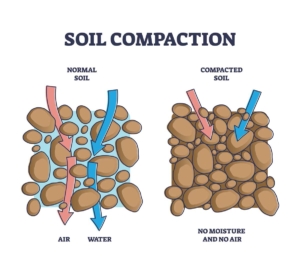
Soil compaction is the process of using weight, impact, or centrifugal force to reduce air pockets in soil, which helps to create a strong foundation for any structure, from a house to an office building. Compaction is critical to the success of any project, but it is also a complex facet of the process. There is unfortunately no one-size-fits-all compaction solution, many factors like the nature of the building, soil type, soil moisture, and more all have influence on the compaction process. But before diving into those complexities, let’s start with why compaction is so important.
Why Compact Before Building?
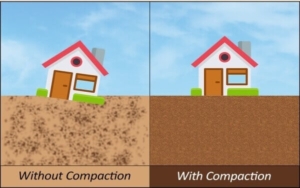
An Exaggerated Example of What Settling Without Compaction Can Cause
Before any project can start, compaction is done to reduce air pockets in soil. This works wonders for the strength of the soil, which will help to keep the structure stable over time and allow a greater load on the soil surface. Additionally, compacted, tighter soil with minimal air pockets decreases the amount of water penetration into the soil, and helps to reduce issues like settling once the project is complete. Things like structural instability, water seepage, and damage from frost during harsh winters can be catastrophic, and can be prevented with proper compaction.
Density and Types of Compaction
Soil comes in many different types of differing densities. Ranging from cohesive clays and silts to gritty soils like gravel and sand. Each type is different in density, particle/grain size, moisture tolerance, and cohesion. These factors all change the approach needed for proper compaction.
There is a plethora of compaction tools available depending on the type of surface. To begin, forward plates like Weber MT’s CF lineup and reversible plates such as Weber MT’s CR options work the best on coarse, granular soil types like gravel and sand, where the particles are of varying sizes, and do not stick tightly together. The vibratory force from the plates is the most efficient way to work this type of surface, which compacts tightly to form a very strong foundation to build on. While both plates tend to perform well with coarse, gravel-like soils, the advantage provided by a reversible plate is the ability to switch the direction with a pull of a lever, allowing much more maneuverability. Another option for your compaction work is a rammer, or “jumping jack” such as Weber MT’s SRV line of rammers which delivers very high impact to a small area. These tools work the best for more cohesive soils like clays and silt. The smaller particles in these more cohesive soils, however, demand moisture content to be carefully controlled for effective compaction. This is because clay and silt harden when dried, requiring careful attention to the water content before compaction.
What Should I do to Compact the Soil Correctly?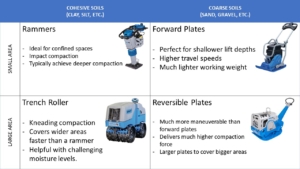
As mentioned, a major consideration in soil compaction is the needed water content of the ground, which depends on the type of soil. On top of this, proper compaction also requires attention to lift depth. This is critical to ensure the quality and uniformity of the compaction work, which goes hand-in-hand with monitoring the moisture of the soil. Uniform compaction is vital for the stability of anything being built on the soil. Another aspect to consider is the number of passes made. While a single pass may seem like enough, it very often takes more than three passes to truly compact soil to the appropriate level. While it can be difficult to tell if the soil has been properly compacted, a tool like the COMPATROL® system included on many gas-powered Weber MT models can make it much easier, saving time and effort on extra passes where they may not be needed.
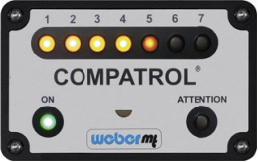
The COMPATROL® System’s Display
The COMPATROL® system uses frequency analysis to take guesswork out of the process and to aid in achieving uniform compaction across the entire area, as well as providing warnings when a weak spot in the compaction is detected. An additional benefit with the system is the ability to avoid over-compacting the soil, which can cause serious instability and lead to damage later on in the project.
Click here to learn more about the COMPATROL® system.
Click here to visit Weber MT’s webpage about the COMPATROL® system.
For more information on the models and equipment we’ve discussed today, check out Weber MT on our Manufacturers page or visit Weber MT’s Website here!
Thank you for visiting us here at The Toolbox! We hope you’ve gotten some value and learned a little something today. Come back again soon!
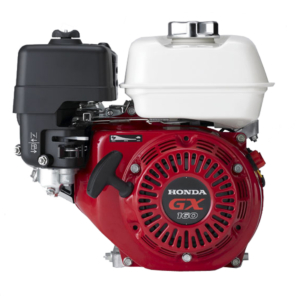 Just as you would with a car, taking the proper care of the engines used in your equipment is critical to keeping your machines running well. Maintaining an engine is a simple routine that goes a long way to keep machines running their best, saving you time, money, and headaches. Today, we’ll be going over a few of the most common Honda® engines found in equipment across a wide range of applications and some of their key maintenance information to help you keep your gear running like new for a long time. The following is a list of some of the most important maintenance points for each engine model.