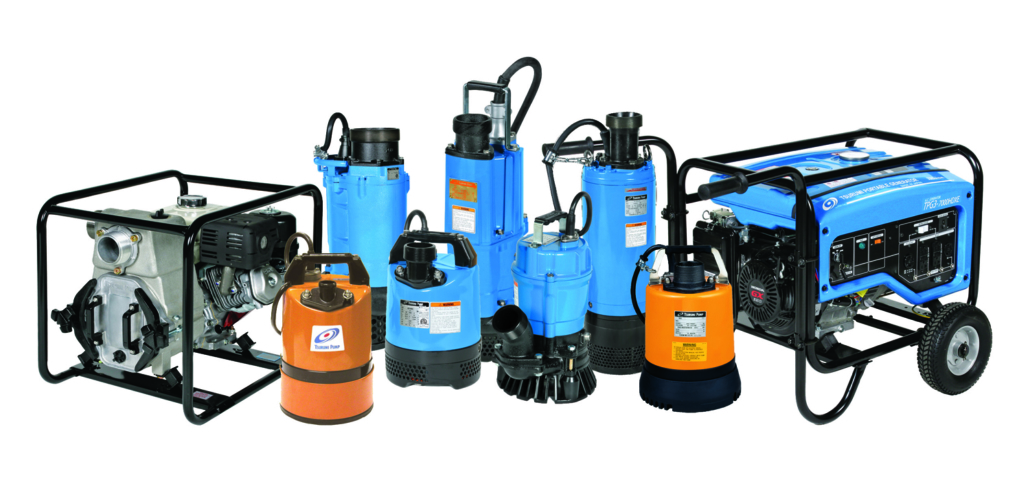
Equipment is a valuable investment, no question about it. And it can be worrisome knowing where items are located, and if it unfortunately ends up stolen. According to the National Equipment Register, less than 25% of stolen equipment is ever recovered. Combine that with the fact that over 70% of equipment owners experience a theft at some point, and the situation seems grim. With equipment theft only rising in recent years, it becomes absolutely essential to keep track of your valuable equipment. Fortunately, there exist many ways to do this, ranging from the use of check-out/check-in systems keeping track of who your equipment is with and where, to using visible security cameras and bright lights for on-site security, and to using asset tracking devices like those from Hapn to monitor the location of machines in real-time.

Equipment, like any other investment, requires protection. The peace of mind provided by Hapn devices is unparalleled and provides extremely customizable tools. Let’s explore what Hapn’s devices and software can do to help you.


CONTENTS

Boundaries

Time Machine

Maintenance

Notification Options

Authority Involvement/Additional Users


SETUP

When you set up with Hapn devices for the first time, you will need to sign in on the web-based Hapn software tool. When you’ve signed up and linked your device with your account, you will be sent to the home page, which displays a map that shows your trackers’ current locations. See the following image for an example.

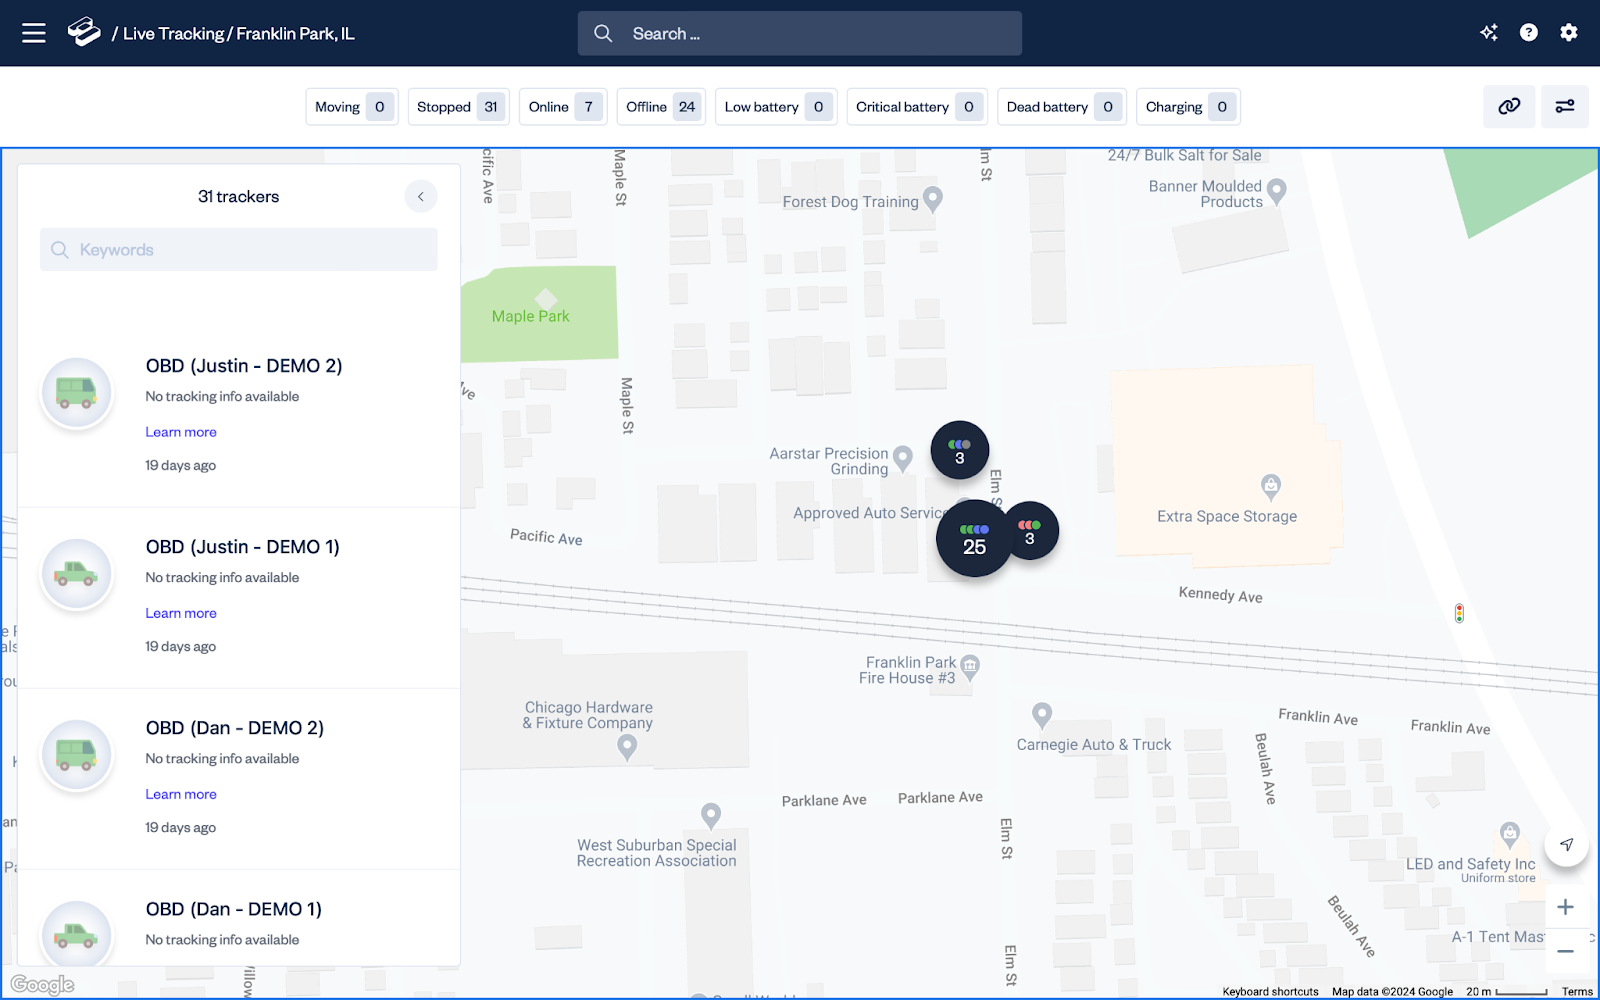
On the map page, you can edit settings, view tracking history, and access a variety of other functions supported by the trackers. Hapn devices can be set with custom update intervals. More frequent pings can be used to keep track of the devices more accurately, or frequency can be set to preserve power on the battery-powered models. Customizable radius options can issue alerts when a piece of equipment enters or leaves a set area on the map as well. This helps to ensure that equipment is kept where it is expected to be, and lets users know the moment it leaves or enters a designated location. When setting up the radius functionality of the Hapn tracking devices, use the web tool to select the area on the map that should be used. The designated areas can even be given hand-drawn boundaries for extremely precise boundary alerts as shown below:
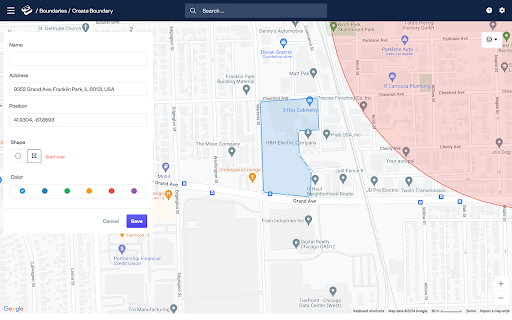
BOUNDARIES

The photo above illustrates a customized boundary that is designed to enclose a specific block, with a customized shape. This function is accessed by clicking on the navigation (three lines) icon at the top left in Hapn’s web tool and selecting the “Boundaries” option. When in the boundary menu, you can create and name boundaries as well as assign them colors on the map for easy visualization. Naming these boundaries is critical for notifications and alerts, which will be explored later. When creating a hand drawn boundary on the map, click from point to point to draw the edges of the boundary and finalize by clicking on the starting point to close the boundary on the map. When drawing a boundary, it is important to keep in mind that the precision of Hapn devices is very high, and the boundary can be as specific and oddly-shaped as necessary to suit individual needs. A boundary line can be drawn to perfectly fit a jobsite or storage area. Click here to read more about the boundary tools in Hapn’s software.

TIME MACHINE

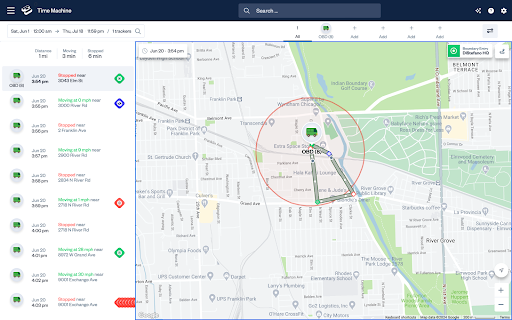
Another feature available in the Hapn toolkit is the ability to view activity in a previous time frame through a feature called the Time Machine. While it doesn’t actually let you time travel, the Time Machine feature in Hapn’s tool allows you to see exact timestamps and locations through a period of time in the device’s history. For example, the following photo shows a list of events on a tracker. Also available on the map is a path showing the route a tracker followed during the set timeframe of its history. This is incredibly useful for making sure that a piece of equipment was in the right place for the entire duration of its usage on a given time period. See this image for an example:


Additional personalization elements include the ability to segment trackers with different colors or photos of vehicle logos/equipment types in order to easily distinguish them on the main map.


MAINTENANCE

One feature that is available on select Hapn models is the ability to track the specific maintenance of a piece of equipment. Things like mileage traveled, hours running, and other stats can ensure that the equipment is operated safely and responsibly. This functionality can be used to monitor the status of specific equipment if it should happen to be misused, as well as maximizing equipment return.

The Hapn web application includes a tool called “Tasks” accessible from the home page in the main menu. Clicking this option will open the task screen, offering three options for upcoming, complete, and scheduled tasks for repetition. This allows the ability to stay on top of maintenance items over time. This feature includes creation of one-time and recurring tasks with controllable time intervals. Reminders can also be set up to set off maintenance notifications at specific odometer readings, or at specific hour intervals. When a task is created, it will appear in the “Upcoming Tasks” page. This will display the name of the task, the tracker it’s assigned to, and any notes describing the task information. This can then provide notification to users with details on specifically what piece of equipment requires which maintenance services. Click here to learn more about Hapn’s easy-to-use maintenance settings and how to set them up.


NOTIFICATION OPTIONS

Hapn also includes a robust array of notification options that can be configured in the web tool. Complete control is given over notification delivery methods with text, email, and mobile app notifications available and granular control over which notifications are delivered where. Notifications include Low battery in battery-powered trackers, boundary entry/exit notifications, and speeding notifications if the tracker exceeds a certain threshold of speed. On select models, a tamper sensor is included and will issue a notification if the tracker detects tampering. Trackers can also issue notifications when they come online or are disconnected. Each type of notification can be set up to be delivered by text, email, or mobile app, and any combination of them. Click here for a more detailed description of Hapn’s notification system and how to configure it.

These notifications are delivered in the browser tool with a banner that appears by default in the lower left corner of the screen and features notification icons denoting boundary exit and entry, speed warnings, and battery alerts.

On top of these features, Hapn offers the ability to quickly relay data to local authorities in the event of equipment theft. If a machine should unfortunately go missing, data from Hapn’s trackers can be quickly and easily delivered to authorities to aid in recovery. Equipment theft is a billion-dollar industry, and has grown steadily in recent years. With less than 25% of stolen equipment ever recovered, choosing Hapn can help keep your valuable equipment safe. To use this feature effectively, access can be granularly controlled and data on only pertinent trackers can be shared, saving time in explanations and confusion with large fleets if law enforcement becomes involved in a theft incident. This also helps safeguard user privacy by allowing only the relevant and necessary information to be shared. The user retains control over the access to this sensitive tracking information.


AUTHORITY INVOLVEMENT AND ADDITIONAL USERS

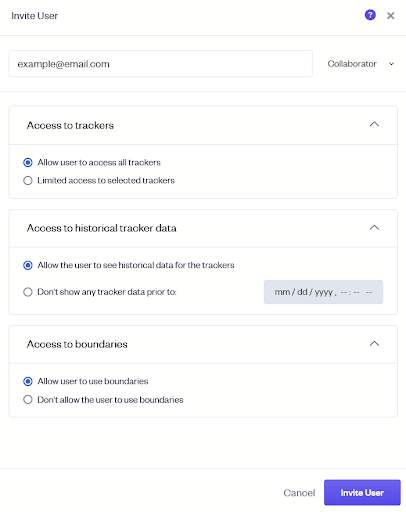
Another key feature of Hapn devices is the ability to share tracking information with law enforcement in real-time in the event of a theft. The information shared can be granularly controlled with user security in mind. When the need arises to share tracking information with law enforcement, Hapn makes the process simple and quick. In the event that access needs to be shared with the authorities, navigate to the Settings menu found in the top right corner of the web tool with a gear icon, and select the “Users” tab in the settings menu.

The next step is to click on the “Invite User” button and enter the email address of the person you’d like to add. After typing in the email, use the dropdown menu to select The role for the new user, either “Administrator” or “Collaborator”. The difference between the two is that a user labeled “Administrator” will always have permission to edit boundaries, where that action can be removed for users labeled “Collaborator”. After setting the role for the new user, the menus allow specific permission for accessing tracker data, modifying boundaries, and access to historical data, shown below:

By clicking the “Invite User” button, an email notification will be delivered to the person with a link to click and gain access. Every user can be assigned different permissions based on usage and individual needs. This is a valuable feature should a piece of equipment end up stolen because when sharing data with the authorities, security can be maintained by restricting access and limiting the user permissions.

Working in the winter months can be tricky, especially when the weather doesn’t cooperate. In some areas, we can experience a wide variety of weather in short times. It’s vital to be prepared for working in any weather condition our area can throw at us.

Ground Thawing

In the harsh winters we experience, working in the cold weather demands the use of ground thawing equipment. During winter, the ground itself doesn’t freeze, rather the moisture in the ground is what freezes, and ground thawing refers to the melting of the water in the ground. This is where ground thawing equipment such as that by Heat King or Thawzall can be employed. Water does a fantastic job of conducting heat, which allows warmth to efficiently transfer from the machine to the ground, and allows the ground to be thawed at the appropriate depth.


An important factor to consider is water vapor, which holds a great amount of heat but can easily be lost. When thawing ground areas, insulating the heating area instead of letting the vapor escape will further increase the effectiveness of the ground heating process. Using quality, multi-layered blankets to insulate the area can help the thaw progress much faster, as well as keeping the hoses clean when thawing is complete. If the vapor starts to vent and be released, the entire process can slow down, extending the time working in the unpleasant weather conditions.


When starting a project, be sure to consider the frost depth, which will indicate the proper equipment FrostMap2
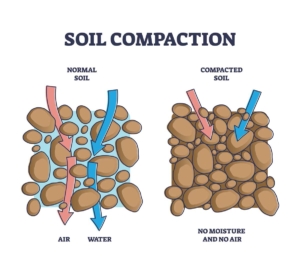
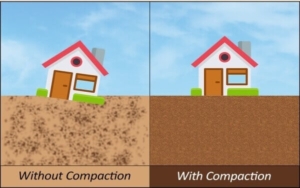
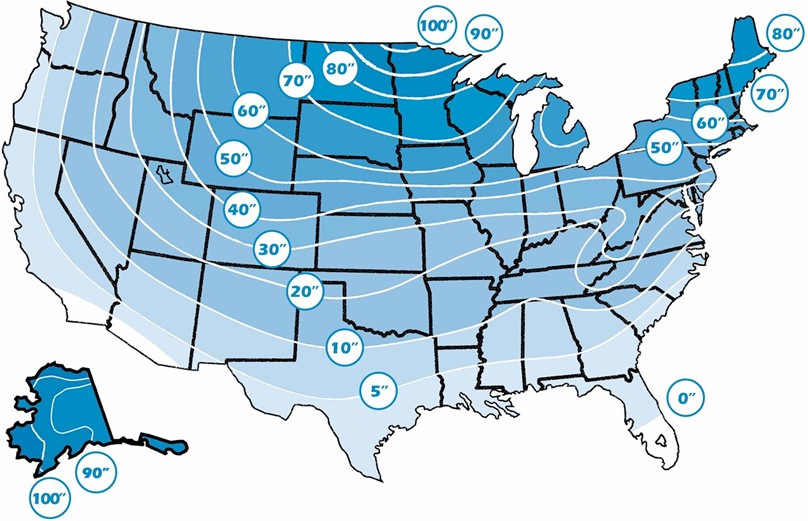
settings needed to thaw. The frost depth is determined regionally, consult this map for reference on where the frost depth will be for your area. Another key factor is the outdoor temperature, which can cause variations in the time needed to fully thaw the work area. Also consider the moisture content of the ground in the work area, too much or too little moisture can result in an unstable foundation, and a project that runs into serious delays.


When beginning the process, use traditional, mechanical methods like snow plowing and shoveling to clear as much snow and frost as possible from the surface of the area to be thawed. This may not be the most pleasant process, but will be far quicker than waiting for a ground thawing system to melt its way through. With the surface clear and an accurate measurement of ground frost depth, the next step is to lay down a FrostDepthTable2
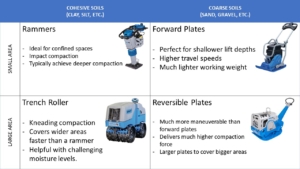
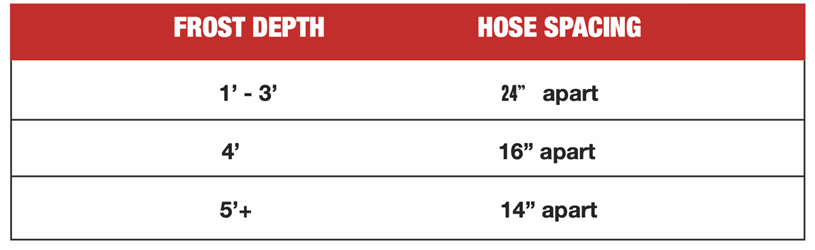
polyethylene layer to act as a barrier for the water vapor to cover the work area, this will dramatically reduce the time needed to thaw the ground by trapping the water vapor and preventing heat from being dissipated. After this, it’s time to lay down the hoses from the heating system. In this chart by
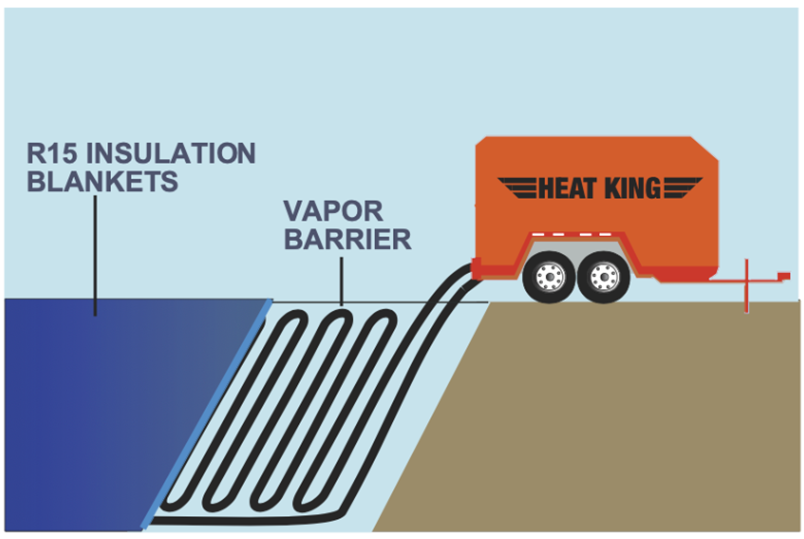
 Heat King, the proper hose layout methods are displayed for many thawing applications.


The layout will be different for each application based on these factors, but anytime ground thaw equipment is involved, it is recommended to use the full available length of hose, even if covering a small area in order to get the most efficiency from the equipment and save the most time.


VaporBarrierGraphic2

Once the equipment is set up and the hose is laid out, the next step is to lay insulation over the hoses. The best way to do this is to use a high-quality poly-clad insulation blanket. Once the thawing process is started, it’s important to let the process continue until all the frost has been melted so that the water can safely drain properly into the ground.

Concrete Curing

Now that we’ve covered ground thawing, we can also look at another important application of heating equipment, which is aiding in the concrete curing process. Concrete will only cure properly with heat, further increasing the challenge of wintertime work. If the concrete is too cold, it won’t cure, but if it becomes too hot, then it can lose essential moisture and the curing process will come to a halt. Ground thawing gear like the HK300 from Heat King and the TCH250 from Thawzall can help with this too, both helping warm the ground before laying concrete, and keeping the concrete warm while curing.


As shown in the graphic here, there are ways to utilize heating equipment to keep the concrete warm while curing, and settings on the heat system can ensure that the concrete does not get too hot and lose moisture.


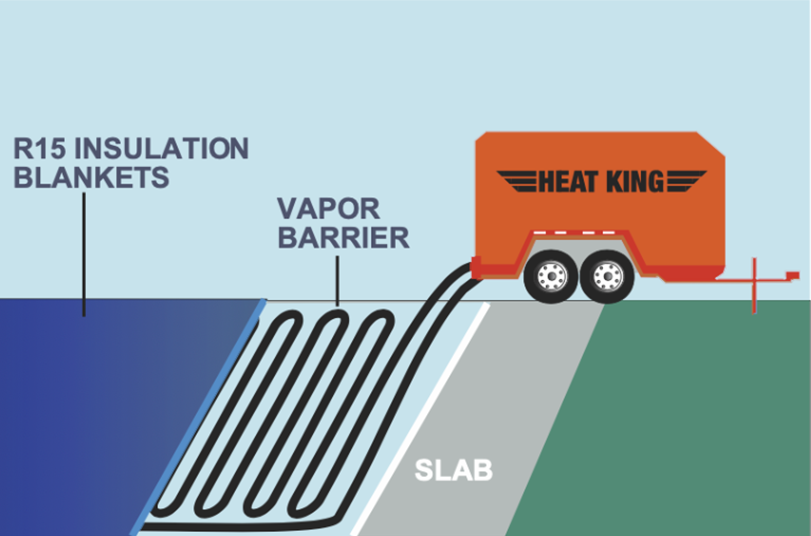
The numerous applications of ground thaw equipment are especially important during the unpredictable weather conditions we face during harsh winters. With the knowledge of how these systems can be applied, we can prepare for any cold weather conditions nature might throw our way.


Thank you for taking the time to read all about ground thawing! Hopefully you’ve learned something new or found valuable information here, visit us again soon at The Toolbox!

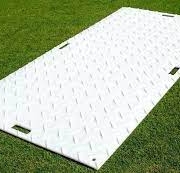
What Is The Purpose of Ground Protection Mats?

When working on any jobsite for any reason, many considerations need to be made about every aspect of the job from start to finish. One facet that is overlooked all too often is the importance of ground protection. Ground protection refers to the practice of placing down material to keep the ground from being damaged by equipment, vehicles, and people walking across it. The key solution to these concerns is to use ground protection mats!

What Are The Benefits  of Ground Protection Mats?

Using ground protection mats like those offered by TerraMat helps to keep equipment from sinking into mud or other uneven surfaces. Many earth-moving machines weigh enough to wreak havoc on the underlying surfaces, eroding or tearing up dirt, grass, turf surfaces, sand, and many other types of uneven ground as they move around a jobsite. Using ground protection mats is an excellent solution, providing more stability and helping to avoid wobbling machinery and equipment sinking into soft ground. This also makes using ground protection mats a large safety upside, because more stable work surfaces increase the control on every aspect of the work. The surfaces of ground protection mats are textured for increased grip when walking or moving equipment over them, such as mats offered by TerraMat that feature different grip designs for aiding the traction of both vehicles and people walking to best suit the application.

As a temporary vehicle roadway, ground protection mats are essential to an efficient job, as well as for preserving areas of the ground that are not being altered, but additionally work as a stable walkway, which 
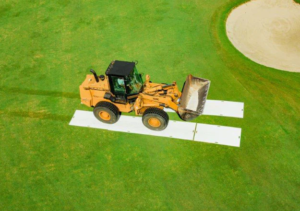
can make them handy in many situations. The mats also work well for this purpose due to their incredible load-bearing ability, with mats from TerraMat boasting up to 80 tons of weight capacity! While being able to support so much weight is a great benefit, they are still flexible and pliable, with rubber as a key ingredient in making the mats allowing them to be flexible and nearly impossible to break under strenuous conditions. They are also available in multiple sizes, all of them incredibly lightweight and easy to transport, making them a perfect choice as a portable, reusable way to build a temporary roadway or walking surface. The mats even come in multiple colors to ensure visibility in many applications. Furthermore, certain options allow light to pass through, which can further reduce damage to underlying grass if the mats will be covering it for extended lengths of time.

Events can benefit greatly from ground protection mats as well, creating temporary floors for convenience and safety in events like festivals or large parties. Another benefit to using ground protection mats this way is accessibility considerations. For instance, an outdoor wedding may use ground protection mats to build a large outdoor area with a stable, clean walking service and is crucial for accessibility during events where attendees may struggle navigating uneven ground and would benefit greatly from a more even, traction-improving surface.

Are There Easy Alternatives?

Frequently, sheets of plywood are used for ground protection, laid down to create a work surface. While it can work, using plywood sheets means that splintering, breaking of the wood, as well as waterlogging are all major issues. There is a solution to these headaches – ground protection mats! Using plywood can result in just as much hassle as not using any ground protection methods. This is because plywood cannot handle the heavy weights that ground protection mats can. Shattering a piece of plywood used in place of a ground protection mat will result in equipment getting stuck in soft soil, splinters everywhere, potential injury, and more jobsite headaches that can all be avoided. Plywood is much less consistent, especially once exposed to the elements, and a surprise break could result in serious trouble on the job. In addition, using plywood means sacrificing much of the surface’s stability, especially on uneven or sloped ground. With those disadvantages, choosing proper ground protection mats is a no-brainer!

We hope that you’ve learned something new and gotten some value from what we’ve shared! Thank you for coming to The Toolbox, visit us again soon!

Flow Diagram

What to Know

When choosing a pump, there are many important considerations that need to be made. First up is the flow, or the rate at which the water moves through the pump and is measured in the amount of water per amount of time, typically gallons per minute. Next up is head, which is the vertical distance that the pump needs to move the water. Another key consideration is the spec of the power source, to ensure that the amperage drawn by the pump is sufficient for safe operation. Other concerns include whether the water is clean or dirty, whether solids are present, and if so their density and composition matters too. The major key is to understand the planned application very well before choosing a pump. Today’s focus is going to be on the world of submersible pumps.


Why Submersible Pumps?

One of the biggest advantages with submersible pumps is the ability to pump higher vertically than engine-powered pumps. Primarily, submersible pumps are powered electrically, which allows excellent versatility. With the knowledge of the required flow, head, and power needs, a pump can easily be selected to suit the job. Tsurumi Pump is a global leader in submersible pumps, offering a wide range of pumps for a variety of applications. Unlike competitors’ pumps that are made for intermittent duty, these pumps use a permanent magnetic motor and are designed for continuous duty, able to be left running for extended periods of time and running more efficiently thanks to larger copper wiring inside. Another design feature used to extend the service life of the machines is the ability to automatically shut down as a failsafe to prevent serious damage if they begin to overheat. Their longevity is further bolstered by other innovative design choices, such as the use of anti-wicking cable, with the wiring protected by a strong epoxy seal, as well as durable mechanical seals made from silicon carbide to resist abrasion over long periods of continuous use. On top of these factors, they are also simple to maintain, with many models boasting easy access to the oil reservoir without requiring disassembly. Another major benefit is the use of a channeled “oil-lifter” system, which helps ensure that the mechanical seals are properly lubricated at all times. Check out this video to see this patented system in action!


Which Pump Do I Need?

As previously mentioned, knowing the application makes all the difference when it comes to choosing a pump. De-watering pumps, for example, must not be used if any solid material is present in the water. For example, an excellent use for de-watering pumps is clearing clean groundwater from a jobsite. De-watering pumps such as the LB-480 and LB-800 by Tsurumi Pump can achieve fantastic flow, and do so with less power strain on a generator than competing pumps. However, if the water being pumped contains any solid matter like grits, leaves, or sand, then a submersible trash pump is the tool for the job. A trash pump like the HS2.4S or HS3.75SL offered by Tsurumi Pump will be able to handle debris, with a volute housing designed to pass solids that are in the water. In addition, many trash pumps in this lineup feature agitators and heavy-duty impellers that keep large solids out while smaller solids pass without clogging the pump. Some trash pumps are designed to push the maximum possible volume at a certain head level, excelling in this task while still being able to tolerate water containing grits or sediments. When selecting a trash pump, considering the media that may appear in the water is critical. Tsurumi Pump’s offerings make this a simple task with the design of their pumps. The bases where water flows into the pumps are carefully designed to only allow solids through that the pump will be able to pass. With the types of pumps in mind, power considerations can be made. Not every 1HP pump is created equal, and the LB and HS lineups can operate more efficiently than competing pumps, getting more out of the horsepower available while using less electricity to generate that power, which can be a lifesaver when using a smaller generator or connecting to shore power that may not have extravagant capabilities. Any job can be tackled with the right pump choice, and thinking about each of these important factors will save time, money, and headache in the long term.

Tsurumi Pump Lineup

We hope that you’ve learned something new about submersible pumps today and gotten some value from what we have to share! Thank you for visiting The Toolbox, come back again soon!

What is Soil Compaction?soil compaction diagram

Soil compaction is the process of using weight, impact, or centrifugal force to reduce air pockets in soil, which helps to create a strong foundation for any structure, from a house to an office building. Compaction is critical to the success of any project, but it is also a complex facet of the process. There is unfortunately no one-size-fits-all compaction solution, many factors like the nature of the building, soil type, soil moisture, and more all have influence on the compaction process. But before diving into those complexities, let’s start with why compaction is so important.

Why Compact Before Building?

Soil Compaction Structure Diagram

An Exaggerated Example of What Settling Without Compaction Can Cause

Before any project can start, compaction is done to reduce air pockets in soil. This works wonders for the strength of the soil, which will help to keep the structure stable over time and allow a greater load on the soil surface. Additionally, compacted, tighter soil with minimal air pockets decreases the amount of water penetration into the soil, and helps to reduce issues like settling once the project is complete. Things like structural instability, water seepage, and damage from frost during harsh winters can be catastrophic, and can be prevented with proper compaction.


Density and Types of Compaction

Soil comes in many different types of differing densities. Ranging from cohesive clays and silts to gritty soils like gravel and sand. Each type is different in density, particle/grain size, moisture tolerance, and cohesion. These factors all change the approach needed for proper compaction.

There is a plethora of compaction tools available depending on the type of surface. To begin, forward plates like Weber MT’s CF lineup and reversible plates such as Weber MT’s CR options work the best on coarse, granular soil types like gravel and sand, where the particles are of varying sizes, and do not stick tightly together. The vibratory force from the plates is the most efficient way to work this type of surface, which compacts tightly to form a very strong foundation to build on. While both plates tend to perform well with coarse, gravel-like soils, the advantage provided by a reversible plate is the ability to switch the direction with a pull of a lever, allowing much more maneuverability. Another option for your compaction work is a rammer, or “jumping jack” such as Weber MT’s SRV line of rammers which delivers very high impact to a small area. These tools work the best for more cohesive soils like clays and silt. The smaller particles in these more cohesive soils, however, demand moisture content to be carefully controlled for effective compaction. This is because clay and silt harden when dried, requiring careful attention to the water content before compaction.

What Should I do to Compact the Soil Correctly?Weber Compaction Chart

As mentioned, a major consideration in soil compaction is the needed water content of the ground, which depends on the type of soil. On top of this, proper compaction also requires attention to lift depth. This is critical to ensure the quality and uniformity of the compaction work, which goes hand-in-hand with monitoring the moisture of the soil. Uniform compaction is vital for the stability of anything being built on the soil. Another aspect to consider is the number of passes made. While a single pass may seem like enough, it very often takes more than three passes to truly compact soil to the appropriate level. While it can be difficult to tell if the soil has been properly compacted, a tool like the COMPATROL® system included on many gas-powered Weber MT models can make it much easier, saving time and effort on extra passes where they may not be needed.

Compatrol Screen

The COMPATROL® System’s Display

The COMPATROL® system uses frequency analysis to take guesswork out of the process and to aid in achieving uniform compaction across the entire area, as well as providing warnings when a weak spot in the compaction is detected. An additional benefit with the system is the ability to avoid over-compacting the soil, which can cause serious instability and lead to damage later on in the project.

Click here to learn more about the COMPATROL® system.

Click here to visit Weber MT’s webpage about the COMPATROL® system.


For more information on the models and equipment we’ve discussed today, check out Weber MT on our Manufacturers page or visit Weber MT’s Website here!


Thank you for visiting us here at The Toolbox! We hope you’ve gotten some value and learned a little something today. Come back again soon!

Honda GX 160 Engine
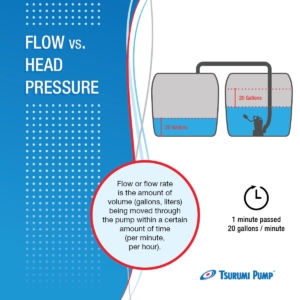
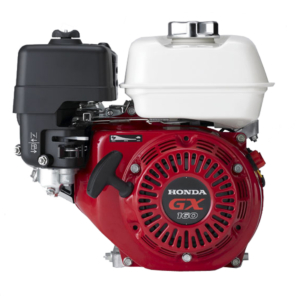
Just as you would with a car, taking the proper care of the engines used in your equipment is critical to keeping your machines running well. Maintaining an engine is a simple routine that goes a long way to keep machines running their best, saving you time, money, and headaches. Today, we’ll be going over a few of the most common Honda® engines found in equipment across a wide range of applications and some of their key maintenance information to help you keep your gear running like new for a long time. The following is a list of some of the most important maintenance points for each engine model.


  • Honda® GX35 – Found in products from vendors including Ground Hog, MultiVibe, Oztec, and more!
    • Oil Capacity: ~2.7oz (Recommended to start here and add until full)
    • Oil Type: SAE 10W-30 Recommended
    • Oil Change Interval: First Month / 10hrs & Every 6 Months / 50hrs
    • Spark Plug Change: Check @ 100hrs & Replace Every 300hrs
    • Air Cleaner Change: Every 3 Months / 50hrs
    • Honda® GX35 Owners Manual


  • Honda® GX50 – Found in products from vendors including Weber MT and more!
    • Oil Capacity: 4oz
    • Oil Type: SAE 10W-30 Recommended
    • Oil Change Interval: First Month / 10hrs & Every 6 Months / 50hrs
    • Spark Plug Change: Check @ 100hrs & Replace Every 300hrs
    • Air Cleaner Change: Every 3 Months / 50hrs
    • Honda® GX50 Owners Manual


  • Honda® GX100 – Found in products from vendors including MultiVibe and more!
    • Oil Capacity: 0.42us qt.
    • Oil Type: SAE 10W-30 Recommended
    • Oil Change Interval: First Month / 20hrs & Every 6 Months / 100hrs
    • Spark Plug Change: Every 6 Months / 100hrs
    • Air Cleaner Change: Every 3 Months / 50hrs
    • Honda® GX100 Owners Manual


  • Honda® GXR120 – Found in products from vendors including Tsurumi Pump, and more!
    • Oil Capacity: 0.3us qt.
    • Oil Type: SAE 10W-30 Recommended
    • Oil Change Interval: First Month / 20hrs & Every 6 Months / 100hrs
    • Spark Plug Change: Every 6 Months / 100hrs
    • Air Cleaner Change: Every 3 Months / 50hrs
    • Honda® GXR120 Owners Manual


  • Honda® GX160 – Found in products from vendors including Tsurumi Pump, Crown Construction, and more!
    • Oil Capacity: 0.63us qt.
    • Oil Type: SAE 10W-30 Recommended
    • Oil Change Interval: First Month / 20hrs & Every 6 Months / 100hrs
    • Spark Plug Change: Every 6 Months / 100hrs
    • Air Cleaner Change: Every 3 Months / 50hrs
    • Honda® GX160 Owners Manual


  • Honda® GX270 – Found in products from vendors including Diamond Products, IMER, Von Arx, and more!
    • Oil Capacity: 1.16us qt.
    • Oil Type: SAE 10W-40 Recommended
    • Oil Change Interval: First Month / 20hrs & Every 6Months / 100hrs
    • Spark Plug Change: Every 6 Months / 100hrs
    • Air Cleaner Change: Every 3 Months / 50hrs
    • Honda® GX270 Owners Manual


  • Honda® GX390 – Found in products from vendors including IMER, Power Buggy, and more!
    • Oil Capacity: 1.2us qt.
    • Oil Type: SAE 10W-40 Recommended
    • Oil Change Interval: First Month / 20hrs & Every 6 Months / 100hrs
    • Spark Plug Change: Every 6 Months / 100hrs
    • Air Cleaner Change: Every 3 Months / 50hrs
    • Honda® GX390 Owners Manual

As you can see, no matter the engine model your equipment uses, maintenance can be a very easy routine. Keeping up on these small, scheduled tasks can keep your engine performing at its best under heavy workloads, and save time and money on costly repairs if left uncared for. Take care of your engines and they will take care of you!

Thank you for taking time to stop by! Visit The Toolbox again soon!