Hapn’s software includes a robust boundary system, allowing you to customize alerts for specific areas. When using Hapn’s web tool, boundaries can easily be configured. To access the boundary settings from the main page of Hapn’s software, click the three-lined “hamburger” icon in the top left and select “Boundaries” from the menu. The list will then display existing boundaries and their corresponding color designations. To create a boundary, click the “New Boundary” button in this menu. A large round boundary will be created by default, but by using the controls on the map, it can easily be resized and repositioned. By clicking the shaded part of the boundary, drag it around the map to place the centerpoint, and click and drag from the edge to resize the perimeter. From the menu, colors can be selected and names assigned to the boundaries, like in the following image.
CUSTOMIZED BOUNDARY SHAPES
To create a more specific boundary, use the ![]() button to draw a custom boundary. After clicking the button, create a new boundary by clicking from point to point on the map to create the desired shape and area. Watch the following video for a quick example:
button to draw a custom boundary. After clicking the button, create a new boundary by clicking from point to point on the map to create the desired shape and area. Watch the following video for a quick example:
Note: all boundaries drawn with this tool must be “closed” by clicking on the starting point after placing the last point on the map.
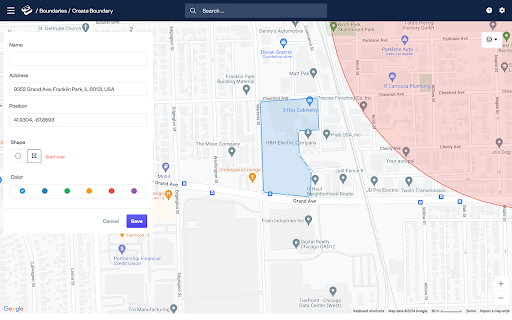
Custom boundaries can be as simple or as oddly shaped as necessary to suit any need. This photo shows an example of a customized boundary that perfectly encloses a specific area:

This could be used, for example, to cover the storage area of a rental fleet, and if a piece of equipment leaves the boundary, a notification will be immediately delivered, allowing monitoring of equipment positions for unwanted movement.
