Everything You Need To Know About Hapn Software
Equipment is a valuable investment, no question about it. And it can be worrisome knowing where items are located, and if it unfortunately ends up stolen. According to the National Equipment Register, less than 25% of stolen equipment is ever recovered. Combine that with the fact that over 70% of equipment owners experience a theft at some point, and the situation seems grim. With equipment theft only rising in recent years, it becomes absolutely essential to keep track of your valuable equipment. Fortunately, there exist many ways to do this, ranging from the use of check-out/check-in systems keeping track of who your equipment is with and where, to using visible security cameras and bright lights for on-site security, and to using asset tracking devices like those from Hapn to monitor the location of machines in real-time.
Equipment, like any other investment, requires protection. The peace of mind provided by Hapn devices is unparalleled and provides extremely customizable tools. Let’s explore what Hapn’s devices and software can do to help you.
CONTENTS
Authority Involvement/Additional Users
SETUP
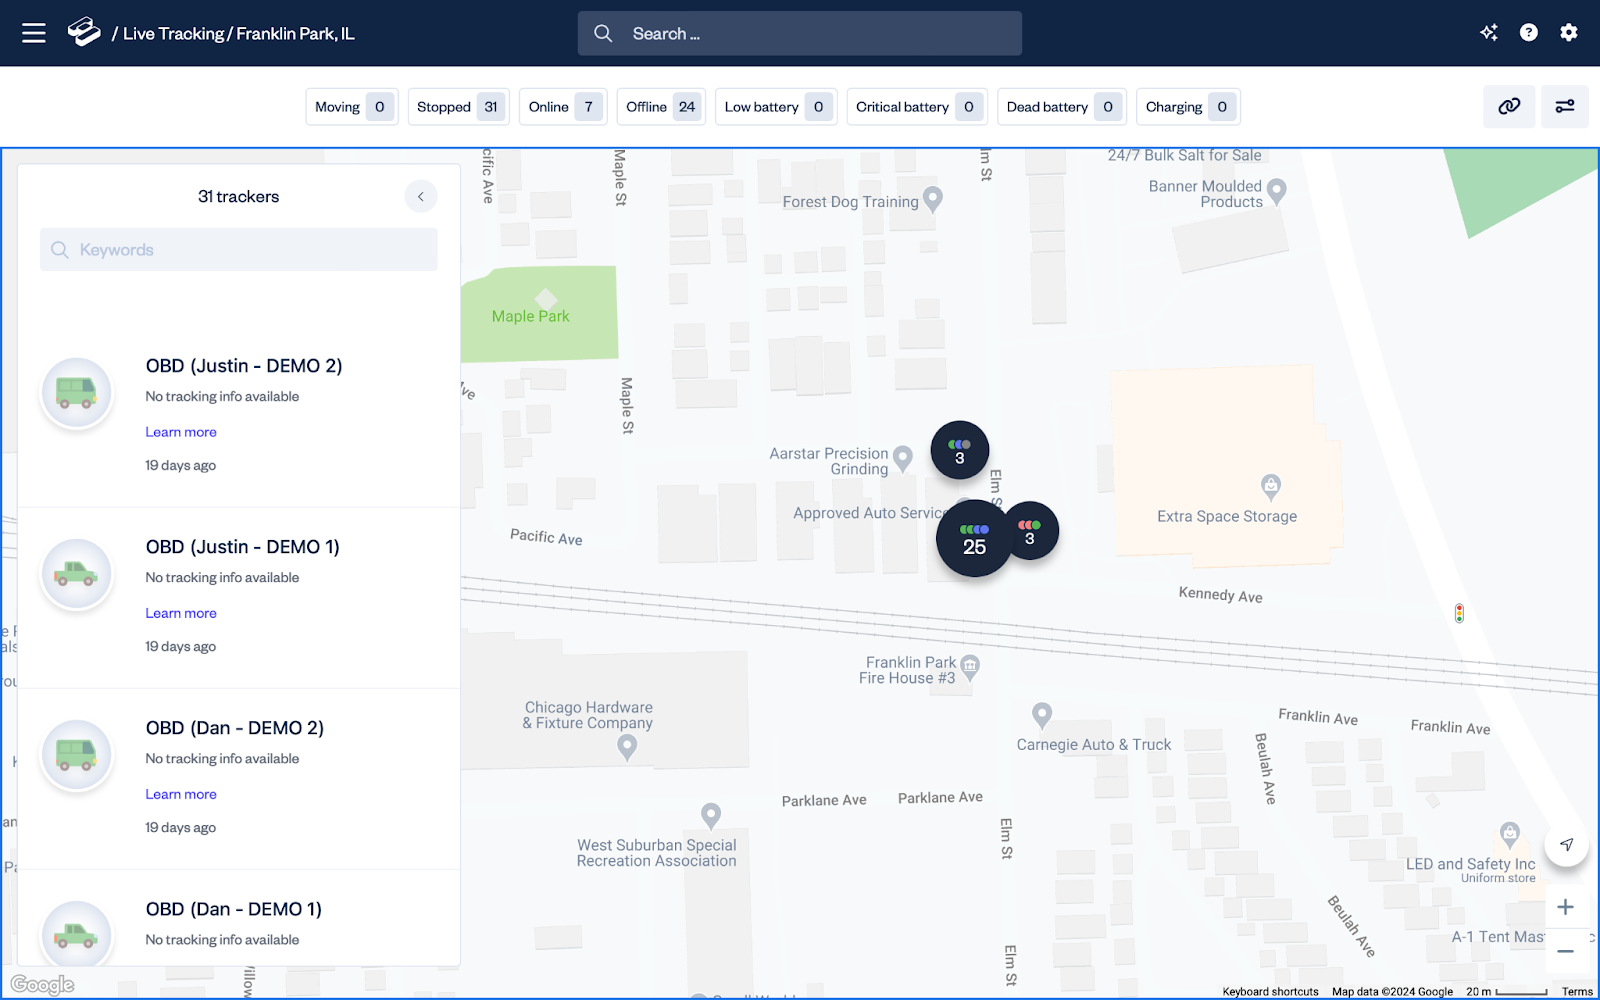
When you set up with Hapn devices for the first time, you will need to sign in on the web-based Hapn software tool. When you’ve signed up and linked your device with your account, you will be sent to the home page, which displays a map that shows your trackers’ current locations. See the following image for an example.

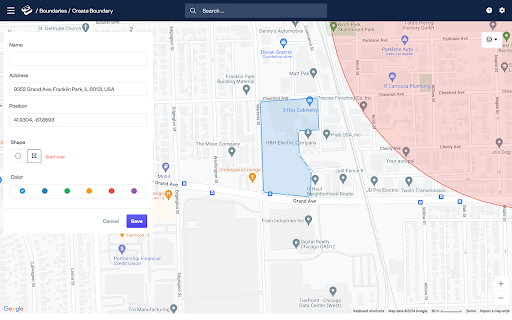
On the map page, you can edit settings, view tracking history, and access a variety of other functions supported by the trackers. Hapn devices can be set with custom update intervals. More frequent pings can be used to keep track of the devices more accurately, or frequency can be set to preserve power on the battery-powered models. Customizable radius options can issue alerts when a piece of equipment enters or leaves a set area on the map as well. This helps to ensure that equipment is kept where it is expected to be, and lets users know the moment it leaves or enters a designated location. When setting up the radius functionality of the Hapn tracking devices, use the web tool to select the area on the map that should be used. The designated areas can even be given hand-drawn boundaries for extremely precise boundary alerts as shown below:

BOUNDARIES
The photo above illustrates a customized boundary that is designed to enclose a specific block, with a customized shape. This function is accessed by clicking on the navigation (three lines) icon at the top left in Hapn’s web tool and selecting the “Boundaries” option. When in the boundary menu, you can create and name boundaries as well as assign them colors on the map for easy visualization. Naming these boundaries is critical for notifications and alerts, which will be explored later. When creating a hand drawn boundary on the map, click from point to point to draw the edges of the boundary and finalize by clicking on the starting point to close the boundary on the map. When drawing a boundary, it is important to keep in mind that the precision of Hapn devices is very high, and the boundary can be as specific and oddly-shaped as necessary to suit individual needs. A boundary line can be drawn to perfectly fit a jobsite or storage area. Click here to read more about the boundary tools in Hapn’s software.
TIME MACHINE
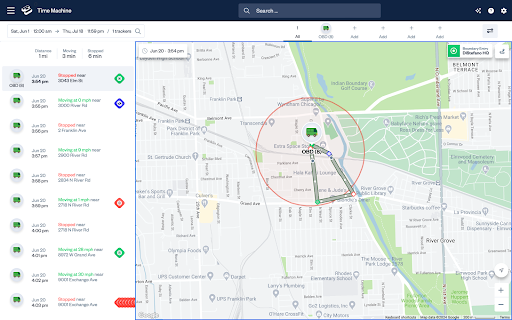
Another feature available in the Hapn toolkit is the ability to view activity in a previous time frame through a feature called the Time Machine. While it doesn’t actually let you time travel, the Time Machine feature in Hapn’s tool allows you to see exact timestamps and locations through a period of time in the device’s history. For example, the following photo shows a list of events on a tracker. Also available on the map is a path showing the route a tracker followed during the set timeframe of its history. This is incredibly useful for making sure that a piece of equipment was in the right place for the entire duration of its usage on a given time period. See this image for an example:

Additional personalization elements include the ability to segment trackers with different colors or photos of vehicle logos/equipment types in order to easily distinguish them on the main map.
MAINTENANCE
One feature that is available on select Hapn models is the ability to track the specific maintenance of a piece of equipment. Things like mileage traveled, hours running, and other stats can ensure that the equipment is operated safely and responsibly. This functionality can be used to monitor the status of specific equipment if it should happen to be misused, as well as maximizing equipment return.
The Hapn web application includes a tool called “Tasks” accessible from the home page in the main menu. Clicking this option will open the task screen, offering three options for upcoming, complete, and scheduled tasks for repetition. This allows the ability to stay on top of maintenance items over time. This feature includes creation of one-time and recurring tasks with controllable time intervals. Reminders can also be set up to set off maintenance notifications at specific odometer readings, or at specific hour intervals. When a task is created, it will appear in the “Upcoming Tasks” page. This will display the name of the task, the tracker it’s assigned to, and any notes describing the task information. This can then provide notification to users with details on specifically what piece of equipment requires which maintenance services. Click here to learn more about Hapn’s easy-to-use maintenance settings and how to set them up.
NOTIFICATION OPTIONS
Hapn also includes a robust array of notification options that can be configured in the web tool. Complete control is given over notification delivery methods with text, email, and mobile app notifications available and granular control over which notifications are delivered where. Notifications include Low battery in battery-powered trackers, boundary entry/exit notifications, and speeding notifications if the tracker exceeds a certain threshold of speed. On select models, a tamper sensor is included and will issue a notification if the tracker detects tampering. Trackers can also issue notifications when they come online or are disconnected. Each type of notification can be set up to be delivered by text, email, or mobile app, and any combination of them. Click here for a more detailed description of Hapn’s notification system and how to configure it.
These notifications are delivered in the browser tool with a banner that appears by default in the lower left corner of the screen and features notification icons denoting boundary exit and entry, speed warnings, and battery alerts.
On top of these features, Hapn offers the ability to quickly relay data to local authorities in the event of equipment theft. If a machine should unfortunately go missing, data from Hapn’s trackers can be quickly and easily delivered to authorities to aid in recovery. Equipment theft is a billion-dollar industry, and has grown steadily in recent years. With less than 25% of stolen equipment ever recovered, choosing Hapn can help keep your valuable equipment safe. To use this feature effectively, access can be granularly controlled and data on only pertinent trackers can be shared, saving time in explanations and confusion with large fleets if law enforcement becomes involved in a theft incident. This also helps safeguard user privacy by allowing only the relevant and necessary information to be shared. The user retains control over the access to this sensitive tracking information.
AUTHORITY INVOLVEMENT AND ADDITIONAL USERS
Another key feature of Hapn devices is the ability to share tracking information with law enforcement in real-time in the event of a theft. The information shared can be granularly controlled with user security in mind. When the need arises to share tracking information with law enforcement, Hapn makes the process simple and quick. In the event that access needs to be shared with the authorities, navigate to the Settings menu found in the top right corner of the web tool with a gear icon, and select the “Users” tab in the settings menu.
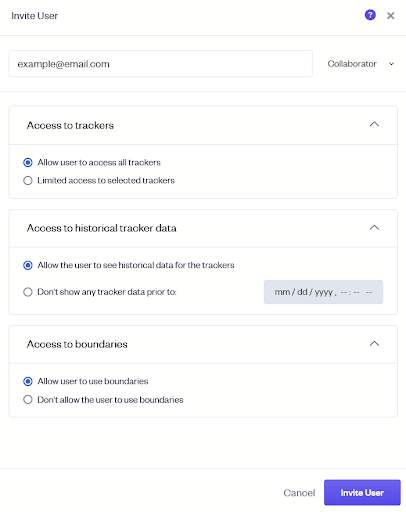
The next step is to click on the “Invite User” button and enter the email address of the person you’d like to add. After typing in the email, use the dropdown menu to select The role for the new user, either “Administrator” or “Collaborator”. The difference between the two is that a user labeled “Administrator” will always have permission to edit boundaries, where that action can be removed for users labeled “Collaborator”. After setting the role for the new user, the menus allow specific permission for accessing tracker data, modifying boundaries, and access to historical data, shown below:

By clicking the “Invite User” button, an email notification will be delivered to the person with a link to click and gain access. Every user can be assigned different permissions based on usage and individual needs. This is a valuable feature should a piece of equipment end up stolen because when sharing data with the authorities, security can be maintained by restricting access and limiting the user permissions.
